How To Make a Web.com Website: A Step-by-Step Guide for Beginners

Last Updated: By TRUiC Team
If you just started a business, you probably don’t need the wide range of customization options or extensive features that come with a content management system (CMS) like WordPress. Instead, you likely want the same three things most small business owners look for in a website builder: speed, ease of use, and affordability.
When it comes to this trifecta, Web.com is one of the best platforms available to help you easily build a website. It boasts intuitive, click-and-edit functionality along with some of the most affordable website plans in the industry. In fact, in our Best Website Builders for Small Businesses in 2024 review, Web.com is our top pick for the least expensive platform.
This article will guide you through the key steps to start making a website with Web.com. By the end, you should have a simple, elegant website that’ll serve as an excellent digital touchpoint for a variety of service-based businesses.
Ready To Get Started?
If you’re ready to learn how to use Web.com to create a website for your small business, visit Web.com to sign up today!
Step 1: Sign Up for Web.com
First, go to Web.com on your preferred browser. Click on the yellow “Get Started” call-to-action (CTA) button to get started.

You’ll immediately be asked to choose a domain name for your website. You may do this by entering your preferred domain name and clicking on the “Search Domain” button to see if it’s available.

If your preferred domain isn’t available, Web.com will present you with a list of alternatives from which to choose.
Alternatively, you may click on the “Choose Domain Later” link to do this later. If you already own a domain, check the “I want to use a domain I already own” box, enter your domain, and then follow the prompts to continue.
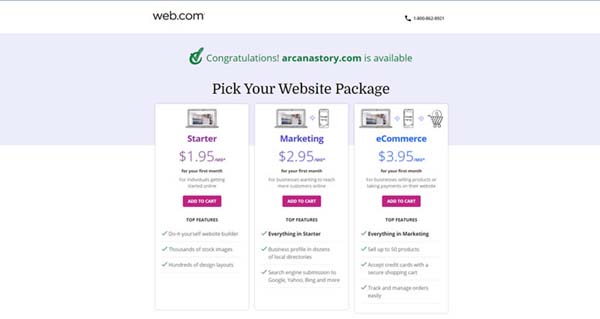
Choose a Web.com Plan
Web.com doesn’t provide an option for you to test the platform before making a purchase. So, after you choose a domain, you must select a premium (paid) plan to continue. The platform does, however, come with a 30-day, money-back guarantee if you aren’t satisfied with your purchase, offering you peace of mind.
TIP: If you have any questions about these steps, click on the blue “Chat Now” button in the lower-right corner of the screen to connect with one of Web.com’s customer service professionals.
As previously mentioned, Web.com is one of the cheapest website builders in the industry. Even the Web.com Starter plan — which costs just $1.95 for the first month — will give you access to most of the platform’s key features. Here’s an overview of Web.com’s pricing and plans:
Once you make your plan selection, simply click on the “Add To Cart” button and you’ll automatically arrive at a page where you’ll need to enter your payment details. Do this, and then click on the “Create Account” button to continue.

Want the details on all Web.com website plans? Check out our Web.com Plans & Pricing article for more.
Step 2: Choose Your Web.com Template
Once you create your account, you’ll automatically reach a page where you may choose your website’s template. You’ll have two options when it comes to choosing a template: “With our help” and “On my own.”

If you click on the “Generate Website” button, Web.com will ask you four simple questions to help its artificial intelligence (AI) wizard match you with the perfect website template based on the needs of your small business.

Clicking on the “Choose Template” button will take you to a page where you can manually select your template based on industry categories.

For the purposes of this guide, we allowed the AI wizard to match us with a template for a service-based business in “Home & Décor.” Once you either select a template or allow Web.com to match you with one, you’ll need to enter a name for your website and some basic information about your business.

While providing this information isn’t mandatory, it can help Web.com populate your website with prefilled content. You also may choose if you want a single-page website or a multi-page website. We chose the latter.
Once you finish here, click on the “Create This Site” button to continue.
Step 3: Set Up Your Page Structure
After you choose your template, you’ll automatically navigate to Web.com’s Site Editor tool. From there, you can modify all of the prefilled content included with your template so it’s consistent with your branding.

The first thing you’ll want to do is ensure your website has all the pages you’ll need and none you don’t. To do that, you may have to add and/or remove a page or two until the page structure exactly meets your needs.
Most service-based business websites need three pages in addition to the homepage: an “About” page, a “Services” page, and a “Contact Page.” But, this may vary according to your specific business model.
Read our article on How to Structure a Website to learn how to setup your website with necessary pages, navigation, content, and more.
Add a Page
Click on the “Pages” icon in the Site Editor’s left-hand menu to open your website’s page menu. Then, click on the “Add” button to continue.

You’ll then have the option to add a new page, folder, or link. Because this section focuses on adding pages, simply click on the “Page” option to continue. You’ll then need to decide if you want to add a blank page, duplicate an existing page, or select from the available page templates.

For the sake of simplicity, we’ll select from Web.com page templates and customize that template later. You’ll find a range of page templates based on industry categories. As a best practice, aim to choose a page template from the same industry category you initially selected for your website to avoid creating an inconsistent design.
Once you find your chosen industry category, click on it to open a selection of page templates to add to your website. These will vary by industry. Here’s an example of an industry category with “About,” Services,” and “Contact” page template options.

Locate the type of page you need, click on it, and then Web.com will automatically add it to your website’s page list.
Reorder the Pages
While there’s no right or wrong order for your page structure, it should have a flow that’s easy for your visitors to follow. As a general rule, this should be something like Homepage > About Us > Services > Contact.
TIP: To undo or repeat any changes you make while creating your website, simply click on the “Back” and “Forward” arrows in the upper-left corner of the Web.com Site Editor.
To reorder your website’s pages, simply click on the “Pages” icon in the Site Editor’s left-hand menu, and then click and hold whichever page you want to move.

You may then drag and drop that page into your preferred page order.
Remove a Page
To delete a page, simply click on the “Pages” icon in the Site Editor’s left-hand menu. Next, hover over the page you wish to delete and click on the “Gear” icon that then appears to open the “Page Settings” menu. Click on the “Delete” link in the upper-right corner of the “Page Settings” menu.

A pop-up window will ask you to confirm your selection. Click on the “Yes” button to delete the page.
Step 4: Update Basic Elements on the Homepage
Once your website has all the pages you want and none you don’t need, it’s time to modify some of the prefilled content included with your template. The primary content we’ll focus on changing in this guide includes text, images, and CTA buttons on the homepage.
For more in-depth instructions on how to fully customize your website, check out our How To Use Web.com tutorial.
Update Your Homepage Header Text
Click on the “Pages” icon in the Site Editor’s left-hand menu. Next, click on “Home” in the page list that then appears. You’ll then see your website’s homepage in the Site Editor. In your homepage’s header area, click on the header’s text box. Highlight and then type in text that aligns with your brand.

Using the editing toolbar that appears when you highlight a piece of text, choose if you want to bold, italicize, or underline the text as well as change its alignment. If you wish, you also may add a link using the “Link” icon.
Click on the “Aa” icon to modify a piece of text’s font.

We recommend using no more than two fonts throughout your entire website — one for headers and another for subheads and content — because more than two will make your website appear cluttered.
Click on the color box at the right end of the editing toolbar to change your text’s color.

We recommend sticking to neutral, brand-specific colors for text to ensure legibility. Avoid bright or washed-out colors that’ll make text more difficult for your site visitors to read.
Update Your Header Image
Hover over the header section of your homepage until a toolbar appears on the right. Click on the “Painting” icon to open the “Background” menu for this section of the homepage.

In the “Background” menu, hover over the image area and click on the “Upload” button to change the image that currently appears within this section of your homepage.

You’ll have the option to upload a photo from your device or choose one from Web.com’s selection of high-quality, royalty-free stock photos.

Once you decide on a photo, click on the “Select” button to make the image appear within your homepage header area.

If you choose to upload a file from your device, ensure you own the copyright for that photo. Additionally, remember to use a high-quality photo that’s relevant to the services you offer and has the proper dimensions for this area of your website.
Update Your Header’s CTA Button
To update the CTA button in your homepage header, click on the button. Next, highlight and replace the placeholder text with new text that matches the action you want visitors to take by clicking on this button.

Follow the same steps outlined in the Update Your Homepage Header Text section of this guide to edit your CTA button’s font and text color as well as change the text format to bolded, italicized, or underlined.
To edit the CTA button’s action, click on the “Link” icon in the editing toolbar.

You may then choose if you want the CTA button to link to a page on your website, an external URL, an email address, or a phone number. If you choose the “Page” on your website option, be sure to select the page to which you want the CTA button to direct visitors.
You also may add an icon to your CTA button by clicking on the “Star” icon in the editing toolbar, and then choosing from one of Web.com’s various icon options.

Be sure to choose an icon that reflects the button’s action. For instance, we chose an “Envelope” icon because we want our CTA button to link to an email address.
Step 5: Preview and Publish Your Web.com Website
Once you finish modifying your website’s template, it’s time to preview and publish your website. Be sure to click on the “Tablet” and “Phone” icons at the top of the Web.com Site Editor to preview how your website will look on these mobile devices.

Click on the “Preview” button in the upper-right corner of the Site Editor to see how your site will appear in a website browser. If you see anything that needs adjustment, head back to the Web.com Site Editor and modify your website until it meets the needs of your business.

Once you finish previewing your website and making any final edits, click on the “Publish” button in the lower-right corner of the Site Editor to publish your website on the internet. If you haven’t already selected a domain name, you’ll need to do that now or Web.com will automatically choose one for you.

Congratulations! You’ve successfully modified a Web.com template to create a website for your small business in just minutes.
Final Thoughts
We hope you found this simple guide helpful as you built a website in a few easy steps using Web.com. If you’re looking for a more in-depth look at some of Web.com’s features, read our How To Use Web.com tutorial.
If you’d like to know more about Web.com’s pricing and plans as well as learn if this platform is the right choice for your small business, check out our Web.com Website Builder Review and Web.com Pricing and Plans for Small Businesses articles.