How to Use Weebly — A Weebly Guide for Beginners

Last Updated: By TRUiC Team
Weebly is one of the best website builders for small business owners and entrepreneurs. Yet, even simple tools can sometimes seem a bit tricky in certain areas. That’s why we created this tutorial to walk you through some of Weebly’s most common tasks, as well as a few that may feel slightly more complicated.
If you haven’t started building a website for your business and want a very simple, step-by-step tutorial to help you get one up and running within a day, check out our How to Make a Weebly Website guide.
Ready to start your website? Visit Weebly
Signing Up for Weebly
Signing up with Weebly is a little bit more complicated since Square bought the platform. There are now two Weebly website builders: Square’s and Weebly’s. We recommend using Weebly’s unless you need a lot of ecommerce features.
For detailed instructions on how to ensure you sign up for the correct Weebly website builder, read our How to Make a Weebly Website guide. We also suggest you upgrade right away so you can use all of Weebly's premium features.
Using Weebly Themes
Weebly has over 50 different themes you can use to start your website. One great thing about using the Weebly website builder is that it lets you change your theme if you decide you don’t like your original pick.
Choosing a Weebly Theme
The first step when making a new website involves picking a theme. In our step-by-step guide, we suggested the Travellin theme. It’s a great option if you aren’t sure which theme to use, but with over 50 other options available, choose the theme you like best.
Switching Themes
A benefit of Weebly is that it allows you to change themes. If you don’t love the theme you originally picked, it’s easy to switch to another.
To switch a theme:
- Click on the “Theme” tab, and then click “Change Theme.”
- When you hover over a theme, you’ll see options to either “Preview” or “Choose” that theme. We recommend you first click “Preview” to see what the new theme will look like with your existing information.
- Once you pick a new theme, click “Choose.” The Weebly website builder will then apply that new theme to your site.
![How to Use Weebly]()

Working With Weebly Pages
If you want to know how to work with pages in Weebly, follow these steps:
- Click on the “Pages” tab. A list of all the pages on your website will then appear in a menu on the left side of the screen.
- Click on one of your pages to open a page-level menu.
![How to Use Weebly]()

Here’s what those menu items mean:
- Page Name: The “Page Name” is what shows up in the site’s navigation menu. In this example, the page is called “Destinations.”
- Hide in Navigation: If you don’t want a page to appear in your site’s navigation menu, check this box. Because you want to limit the number of pages within the main navigation menu, use this to hide extra pages and/or subpages.
- Header: You can choose whether or not you want your page to have a header — the large area at the top of the page. On the “Destinations” page example, the picture and the words “The Great Wall” form part of the header.
- Visibility: You can set a page’s visibility to one of three options:
- Public: This allows everyone to see the page.
- Site Password: You can create a password for your website and designate specific pages as password-protected. These options require a Weebly Professional or Performance plan.
- Members or Groups: If your site has pages that only certain members or groups may see, choose this option. This option also requires a Weebly Professional or Performance plan.
- SEO Settings: This is where you set search engine optimization (SEO) information for each page.
- Copy: You can copy a page and then rename it — a helpful feature if you’ll have multiple, similar services or location pages.
- Delete: If a page won’t work for your website, you can delete it here.
Adding, Deleting, and Moving Pages
You can add, delete, or move pages within your website as needed.
Adding a Page
If you need more pages, you can add them from the “Pages” tab.
Weebly has four different types of pages:
- Standard Pages: This is the page type you’ll use most often.
- Blog Pages: This is a special page designed specifically for Weebly blog posts.
- Category Pages: Usually used for online stores, this type of page has all products within a specific category.
- Product Pages: This type of page focuses on just one product in an online store.
Weebly also offers two more options:
- External Pages: This type of page appears in your site’s navigation menu and takes anyone who clicks on it to an outside page on another website.
- Non-Clickable Menus: Use this option if you want the top-level menu item to stay non-clickable when you create a submenu.
To add a standard page:
- Click on the “+” (plus) symbol.
- Select “Standard Page.”
- Enter the name of the new page as you want it to display in the menu.
- Select whether you want the page to have a header or no header.
- Click “Done.”
Moving a Page
To move a page, click on the page and drag it up or down in the list of pages. This will rearrange the order the pages appear in your site’s navigation menu.
Deleting a Page
To delete a page, click on a page and then click the “Delete” button.
Setting Up Weebly Navigation
The menu bar at the top of your website should help users understand what they’ll find on each page. It also helps them find the information they’re looking for more quickly.
Rearranging a Navigation Menu
To rearrange items within your site’s navigation menu, click on the “Pages” tab and then drag the pages up or down to move them within the menu.
Creating a Submenu or Subpage
To create a drop-down submenu, click on a page and then drag and drop it under the main menu page.
Here we created two subpages called “Air Travel” and “Hotels” and then moved them under “Services” in the navigation menu.

Hiding a Menu Item
To prevent a page from displaying in the navigation menu, click on the page and then check the “Hide in Navigation” box.
Working With Weebly Sections
Websites are made up of pages and those pages usually have multiple sections. Sections help you create — and more easily move — similar groups of information.
Adding and Deleting Sections
Whenever you want to include a new type of information on your website, use a new section.
To add a section:
- From the “Build” tab, click on the “Section” block in the left-hand menu and drag it to where you want the section to display on your page. You’ll see a blue line as you drag the block.
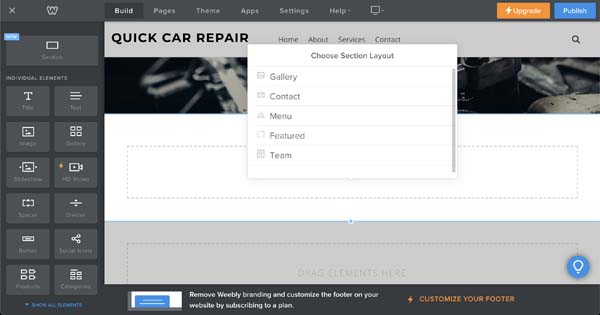
- Drop the “Section” block when the blue line appears where you want it on the page. A list of section layout options will then appear:
- As you click on each section layout option, you’ll see a picture of those different layouts. Pick a layout and click “Save.”
To delete a section:
- If you no longer need a section, delete it from your site. But proceed with caution because the Weebly website builder doesn’t have an “Undo” button.
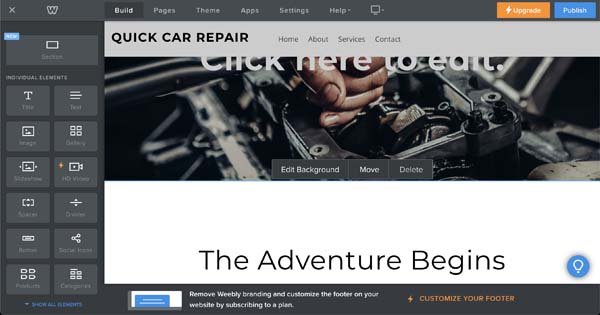
- Click near the top of the section you want to delete. Three buttons will then appear: “Edit Background,” “Move,” and “Delete.”
![How to Use Weebly]()
- Click on the “Delete” button.
- Confirm you want to delete the section.
Working With Weebly Backgrounds
Weebly has four background options:
- An image
- A color (solid colors)
- A gradient (pick two colors to fade from one to the other)
- A video (for users with Weebly Professional or Performance plans only)
Changing the Background
You can easily change the background of a section to a color or image that matches your brand.
- Click near the top of the section you want to change. Three buttons will then appear: “Edit Background,” “Move,” and “Delete.”
- Click on “Edit Background.”
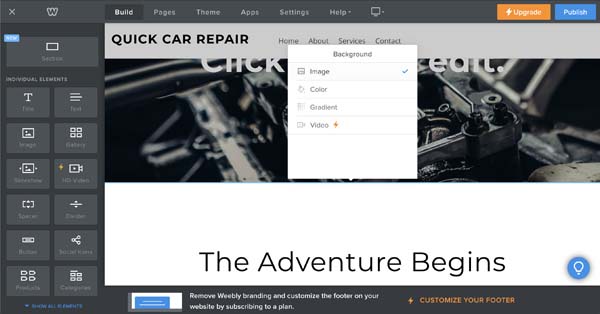
- The type of background currently in that section will appear at the top of the “Background” box. In this example, it’s an image.
- Click on the current background type and a menu with the background options will appear.
![How to Use Weebly]()
- Choose the type of background you want and then follow the instructions to personalize it for that section.
Customizing Fonts in Weebly
In Weebly, users can only change fonts as a site-wide style. That means you can’t change the font for an individual piece of text. Instead, if you change the font for the “Paragraph Text” style, all pieces of text that have that style will change to the new font.
But you can change other font attributes for an individual piece of text. To change the margins for a piece of text, see the section below for step-by-step instructions.
Changing a Style’s Font
In Weebly, an individual font is used for all text within a specific style. That means if you change the font you use for the “Headline” style, for example, all headlines on your site will appear in that new font. As a result, you can’t change the font used for an individual piece of text.
- Click the “Theme” tab.
- Click the “Change Fonts” button. The available styles will then appear on the left of the screen as in the screenshot below.
![How to Use Weebly]()
- As you hover over a style, a blue box will appear around any part of the displayed page that includes that style. When we hover over the “Headline” style here, a blue box appears around “Quick Car Repair.”
- To change a style, click on the name of the style (e.g., “Headline”).
![How to Use Weebly]()
- Click on the current style’s font name to open a long list of available fonts. Choose a font that matches the look and feel of your business’s image.
- Change the font size, color, spacing, etc.
- Click the back arrow to the left of “Change Font” to return to the font menu.

Formatting Text
While you can only change fonts at the style level, you can change the appearance of text at the style level or for an individual piece of text. By text appearance, we mean the:
- Color
- Format (e.g., bold, italic, or underlined)
- Size
- Alignment (e.g., left, center, or right)
The previous section explained how to change the appearance of a font at the style level. Here’s how to change the appearance of an individual piece of text.
To visually format text:
- Highlight the piece of text you want to change. A toolbar will then appear above the text.
![How to Use Weebly]()
- From this toolbar, you can change:
- Whether the text is bolded, italicized, or underlined.
- The text size (by clicking on the “+” or “-” symbols).
- The text color.
- Where the piece of text links.
- If the text represents part of a bulleted or numbered list.
- Any extra formatting and return the text to the original style (by clicking the “Tx” symbol).
- Any edits you make using this toolbar (by using the “undo” or “redo” arrows) before you click outside of the text box and save the changes.

Using Columns in Weebly
As a drag-and-drop website builder, Weebly builds columns with blocks. When you first drag a block over to your website, it takes up the entire width of the screen. When you drag another block over and drop it alongside the first block, it’ll create two equal columns. Keep dragging blocks over to make the number of columns you want.
Here’s an example of a page that features three columns created with images.

Creating Columns
For this example, we’ll use “Image” blocks to create columns. But you can replace this with any kind of block.
- Click on the “Image” block, drag it to a blank area of your website, and then drop it when a blue line appears across the screen.
- Grab another “Image” block and drop it when a blue line appears along the left side of the first block. You should now have two equal columns.
- Repeat the second step until you create however many columns you need.
Working With Images in Weebly
Weebly makes it easy to upload images to your website, but unfortunately, you can’t save them in an image library.
Carefully consider the following as you upload images in Weebly:
- Make sure you can legally use the image — because you own it, because it’s a royalty-free image, or because you bought a license to use it on your website.
- Make sure the image isn’t so large that it slows down your website.
Adding Single Images
If you just want to add a single image to your website, use the “Image” block.
- Drag an “Image” block over to your site. A blue line will then appear to show the image’s placement on the page. Drag and drop it wherever you want it to appear. The image will fill the entire space.
Adding an Image Slideshow
Weebly makes it easy to create a slideshow to show multiple images.
To add an image slideshow:
- Drag a “Slideshow” block over to your site and drop it when the blue line appears in the desired location. The “Choose a Slideshow Style” menu will then appear.
![How to Use Weebly]()
- After you choose a slideshow style, the “Manage Slideshow Photos” box will appear.
- Click the green button to choose pictures to upload from your computer. The Weebly website builder will then upload your images.
- Drag the images to move them into a different order as needed.
- A small toolbar will appear above each image that enables you to:
- Add a link to the image.
- Add a caption for the image, which will then appear below the image.
- Add “alt text” for the image, which a screen reader will then read to visually impaired site visitors.
- Delete the image.
- Click the “Save” button.
- To customize slideshow options, click on the slideshow. A “Slideshow” box will then appear.
- From this box, you can:
- Add or edit photos.
- Change the transition style — the way the pictures change from one to another.
- Change the navigation (e.g., whether the slideshow uses thumbnails or numbers to represent the additional photos).
- Change the speed (e.g., how fast the photos change from one to another).
- Change the spacing above and below the slideshow.
- Choose the caption location — either below or on top of the photo.
- Change advanced options, such as if you want the slideshow to play automatically, start at the beginning, or start randomly.

Adding an Image Gallery
Photographers, artists, and other types of businesses need to display multiple images at once. Weebly offers a “Gallery” block to make this easy.
To add an image gallery:
- Drag a “Gallery” block over to your website and drop it when the blue line appears in the desired location.
![How to Use Weebly]()
- Click on “Upload Images” to add the images you want to include in the gallery.
- After Weebly uploads your images, click on the gallery to make the “Gallery” box appear.
- From the “Gallery” box, you can:
- Add images.
- Change the number of columns.
- Change the spacing above and below the image gallery.
- Designate where captions should appear.
- Change Advanced features, such as the amount of space between images, if the images have a border, and if you want the images to appear as squares or rectangles.
To customize images at the individual level, click on the picture and a menu will appear above that image.
- From this menu you can:
- Add a link to that image.
- Add a caption for that image.
- Add alt text for that image.
- Delete the image.

Deleting Images
It’s easy to delete an image but proceed with caution because there’s no “Undo” function in Weebly.
To delete an image in Weebly:
- Hover over the image you want to delete and click the red “x” button that’ll appear in the upper-right corner of the image block.
![How to Use Weebly]()
- Confirm you want to delete the image.

Adding Favicons and Footers in Weebly
The little picture that appears at the left end of each browser tab is called a favicon. These images help internet users quickly identify the website they’re on.
When you create a website in Weebly, it’ll feature the standard Weebly “W” favicon in the browser tab by default.
Users of Weebly’s paid plans can instead feature their own custom favicons. A favicon usually appears as a smaller version of a company’s logo or other graphic that aligns with its image. They typically measure about 16 by 16 pixels.
If you don’t yet have a favicon, you can create one with a tool like Favicon.io. This tool gives you a zip file to download. From that file, use the favicon.ico file as your favicon.
To add a favicon:
- Click on the “Settings” tab and scroll down to the “Favicon” section.
![How to Use Weebly]()
- Click the “Upload” button and then upload your favicon.ico file.
- Click the “Publish” button to publish your website with your new favicon. It can sometimes take a couple hours for the new favicon to appear.

One great benefit of upgrading to a Weebly paid plan is the ability to add a footer to your website. This block of text at the bottom of your website remains the same on every page.
To add a footer:
- Scroll to the bottom of your website and click in the footer area.
- Select “Click to Add Footer” button and the “Choose a Layout” window will appear.
- Click on your preferred layout to start editing. At any time, you may click cancel to return to the previous screen and choose another layout.
- Make the necessary changes, and then click the “Save Footer” button.
Final Thoughts
Hopefully, this guide proved helpful as you built your Weebly website. For additional information, visit Weebly’s website or read our simple step-by-step guide for instructions on how to easily make your website from scratch.
Complete Weebly Review
Weebly Website Examples
Weebly Pricing & Plans