How To Make a Strikingly Website: A Beginner’s Guide To Strikingly
Last Updated: By TRUiC Team
You don’t need the skills of a website designer — or the resources to hire one — to create your business website with Strikingly. This website builder will help you create a professional business website in just minutes!
In this guide, we’ll show you how to make a Strikingly website with all bells and whistles in just a few minutes. By the end, you’ll have a basic website that’ll suit nearly any small business.
Step 1: Sign Up for Strikingly
The first step in creating a Strikingly website for your small business is to create a Strikingly account. You can sign up and build a website for free, but we recommend upgrading to a premium (paid) plan so you can use all of the Strikingly website builder’s features as you create and customize your site.
Ready To Try Strikingly?
It’s free and easy to sign up! Just visit Strikingly to get started.

Go to the Strikingly website, type in your name, email address and a password, and then click on the “Get Started. It’s Free!” button to sign up. The name you enter here is the name Strikingly will use to refer to your site. If you’d like to name your site after your business instead of your personal name, go ahead.
Once you sign up, the Strikingly website builder will take you to its template library. You can narrow down your search by selecting your business’s industry at the top of the page. Aim to choose a template specific to your industry because it’ll provide the general layout as well as the overall look and feel of your site.
That’s all it really takes to create a generic site with the Strikingly website builder. But, you still need to customize the words and images to match your specific business.
Upgrade Your Strikingly Site
Ideally, you’ll upgrade to a premium (paid) plan now so you can access the premium features Strikingly offers as you create your website.
For most small businesses, we recommend the Strikingly Pro plan. It provides everything most service-based businesses need, including the search engine optimization (SEO) tools vital to ensuring people find your business when searching online. Here’s a brief overview of this platform’s pricing and plan tiers:

Change the Strikingly Template
The Strikingly website builder will automatically create a site for you based on what it thinks works best for your industry. If you prefer a different look and feel, you can easily swap your template for another or just tweak a few elements to customize it a bit more.
To change your site’s template, click on the “Styles” block at the top of the Strikingly Editor’s left-hand menu and then click on the “Change Template” button. Scroll through the available templates and click on any you want to preview. For example, here’s a preview of the “RemoteJoy” template:

Click on the “Switch To This Template!” button in the upper-right corner of the screen to automatically apply the new template to your site.

We chose the “RemoteJoy” template for our example service-based business website.
Step 2: Upload Your Logo to Strikingly
Your website’s navigation menu can display both your business’s name and logo. Our chosen template places both our business name and logo in the upper-left corner of our example website.
To add your business logo:
- Hover over the current logo until the “Edit” button appears. Click on the “Edit” button to open the “Logo Editor” pop-up menu.
![How to make a website using Strikingly.]()
- Click on the “Replace” option to open a separate “Image Upload” menu. Use that menu to upload an image from your computer, link to one on the internet, or choose one from the Strikingly Image Library.
![How to make a website using Strikingly.]()
- Remember to add “Alt Text” for your logo to improve your site’s accessibility and ensure any visitors who use screen readers can still enjoy your business website.
- Click on the green “Save” button to update your site with your changes.

Tip: If your logo appears too small in your site’s navigation menu, don’t add your logo and instead use text.
Step 3: Update the Homepage Header Area
The homepage header area is the most important part of your business website because it’s the first thing visitors see when they arrive. The main elements of the homepage header area should include:
- A large image that covers the top of the homepage
- A headline (and subhead if your template allows)
- A call-to-action (CTA) button
Read on to learn how to tailor each of these elements to your business.
Change the Homepage Header Image
The header image that appears at the top of your homepage is the most important image on your website. It should give visitors a clear view of your business’s purpose and offerings.
Some helpful ideas for homepage header images include:
- An external view of your business
- A photo of your services in action
- Happy people using your product(s) or service(s)
- A photo of your product(s)
Ideally, you’ll use one of your own high-quality photos of your business for your homepage header image. But, many new business owners don’t have access to these when just starting out.
If you don’t have your own personal photo to use, the Strikingly website builder offers free images specific to your industry in its Image Library. Alternatively, you can search a website like Unsplash.com and download a royalty-free image. Just ensure the image has a horizontal orientation.
Note: Always confirm you have the legal right to use the images you display on your website. Don’t simply search for images via Google and use them. Make sure you have permission to use every image on your site.
Once you select your preferred homepage header image, it’s time to replace the placeholder image that came with your template.
To replace the existing homepage header image:
- In the homepage header area, hover over a section you want to work with and click on the “Background” button to open this “Background” menu.
![How to make a website using Strikingly.]()
- Click on the “Image” tab at the top, and then click on the “Upload Image” button to select a photo from your own computer.
- The Strikingly website builder also will present several options at the top of the “Background” menu from its Image Library for your consideration. Hover over the thumbnail versions to preview these images. To see more free images, click on the “More” option to open the Strikingly Image Library.
- Once you either upload your own image or find one in the Strikingly Image Library, click on the green “Save” button to update your site with your changes.

Change the Headline
You want the headline in your homepage header area to clearly state what your business offers visitors. Be descriptive, but avoid anything that sounds too cute. To change the headline, click on the existing headline to highlight it and then type in your new headline.

Update the CTA Button
The CTA button that appears in the homepage header area of your website should take your visitors one step closer to becoming customers.
Some ideas for effective CTA buttons include:
- Call ###-###-####
- Contact Us
- Schedule Now
- Buy Now
To change the CTA button:
- Click on the current button to open the “Content & Design” menu.
![How to make a website using Strikingly.]()
- Use this menu to update the CTA button’s text as well as link it to another part of your website or connect it to a scheduling or calling app.
- Click on the “Design” tab to change the button’s size, style, alignment, and color.
- Click on the green “Save” button to update your site with your changes.

Step 4: Update the Rest of the Homepage
The sections that appear on your website’s homepage will differ based on the industry you choose when you sign up with Strikingly. For the sake of getting your website up and running quickly, we recommend leaving the sections Strikingly provides and simply updating their text and images to match your business.
Set Up a “Subscribe” Section
Most Strikingly templates include a section that’ll allow your website to collect visitors’ email addresses so they can receive your newsletter or other marketing materials.
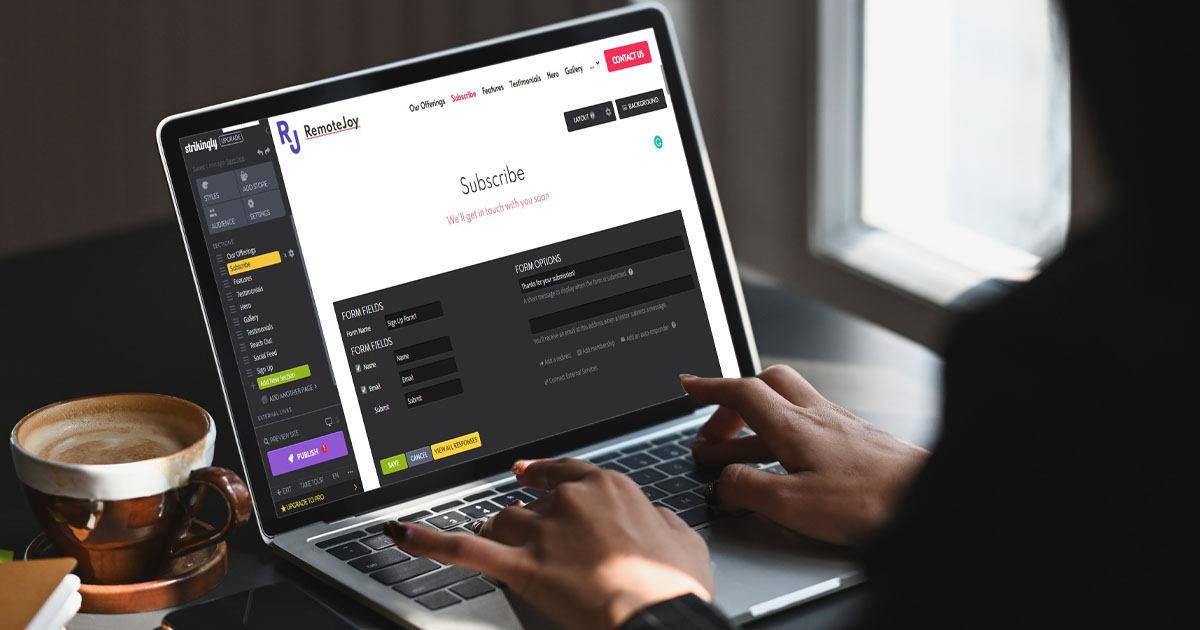
To set up a “Subscribe” section:
- Use the Strikingly Editor’s left-hand menu to navigate to your “Subscribe” section.
![How to make a website using Strikingly.]()
- Hover over the “Subscribe” section and click on the “Gear” icon in the “Layout” button that then appears. This’ll open a “Layout” drop-down menu from which you can alter this section’s general settings. For example, do you want it to include media and, if so, on the left or right side? Also, what function do you want the “Subscribe” section to perform (e.g., enable visitors to sign up for a service, direct them to an app they can buy in an app store, or provide a general button that links elsewhere)?
- Update the “Headline” and “Description” areas of the “Subscribe” section by clicking on the existing text to highlight it and then entering your preferred text.
- Next, click on the current form fields to open the “Form Fields & Form Options” menu.
![How to make a website using Strikingly.]()
- Use this menu to update the form’s name, its required fields, and the thank you message visitors will see after they complete the form.
- Click on the green “Save” button to update your site with your changes.


Update the Footer
While it doesn’t get the same recognition as the homepage header, the footer represents another important part of a successful business website.
Visitors to your site will expect to find certain information in the footer, including:
- A copyright date
- Links to your “Privacy Policy” and “Terms of Service” sections
- Your business’s contact information
- Social media icons linked to your business’s social media accounts
To update the footer:
- Scroll all the way to the bottom of the Strikingly Editor to arrive at your site’s footer.
- Click on the “Gear” icon within the “Layout” button to try different layouts.
![How to make a website using Strikingly.]()
- Update the text to reflect any copyright or other information you may want to include by clicking on the existing text to highlight it and then typing in your preferred text. You can even link text in the footer to other parts of your site.
- Click on the “Square” icon to the right of the “Layout” button to adjust your footer’s background color. Keep clicking on it to rotate through the different color options.
![How to make a website using Strikingly.]()
- Click on the social media icons to add connections to your business’s Facebook, Twitter, Instagram, and other social media accounts.
- Click on the green “Save” button to update your site with your changes.


Step 5: Test and Publish Your Website
Open your website on a variety of devices with varying screen sizes, such as an iPhone, an Android phone, a laptop, and a large desktop computer. Try different internet browsers as well to ensure your site looks how you want it to appear on each device.
Click on and test every button and link to confirm they work as expected. Get a trusted friend to read through and test each page of your site. That extra set of eyes can help you catch any typos or broken links you might miss.
If something doesn’t work as intended, return to the Strikingly Editor to make the necessary changes. Once you finish testing your Strikingly website and making any final edits, it’s time to go live on the internet. To publish your Strikingly website, simply click on the “Publish” button at the bottom of the Strikingly Editor’s left-hand menu. For more information on purchasing and connecting a domain, read our in-depth How To Use Strikingly tutorial.
Final Thoughts
Congratulations! You’ve successfully built a simple website using the Strikingly website builder in just minutes. For in-depth instructions on how to customize your site, check out our How To Use Strikingly tutorial. Still trying to decide if Strikingly is the right platform for your small business? Read our Strikingly Website Builder Review for more information.