How to Use the GoDaddy Website Builder for Your Startup

Last Updated: By TRUiC Team
GoDaddy offers one of the best website builders for startups and entrepreneurs. In fact, the GoDaddy website builder ranks first in our Best Website Builders of 2024 guide.
We gave GoDaddy our highest rating based on its ease of use. However, even extremely intuitive tools can sometimes seem a bit tricky in certain areas. That’s why we created this tutorial to walk you through some of the GoDaddy website builder’s most common tasks, plus several that may feel slightly more complicated.
Recommended: It’s easiest to follow along to this GoDaddy tutorial if you have a GoDaddy account. Be sure to get started with a GoDaddy free trial.
Signing Up With GoDaddy
If you haven’t started building your business website and want a simple, step-by-step tutorial to help you get one up and running within a day, check out our How to Make a GoDaddy Website guide.
The GoDaddy website builder often provides multiple ways to complete certain tasks. If this guide doesn’t cover a specific task you need to complete, you can always consult GoDaddy’s excellent customer service team. That said, we’ve made this guide as thorough as possible to help you get your website up and running quickly.
We also recommend you upgrade now so you can take full advantage of GoDaddy’s premium features. For information on GoDaddy's pricing and tiers, check out our GoDaddy Pricing article.
For more information on GoDaddy, be sure to read these other useful articles:
GoDaddy Website Builder Review
GoDaddy Website Examples
Best Business Website Builder Review
Using GoDaddy Themes
When you signed up with the GoDaddy website builder, GoDaddy asked you to answer a few questions about how you intend to use your website, as well as select your business’s industry. Based on that, the platform automatically chose a template for your website with generic content tailored to that industry. You can’t change this template without starting a new website in a different industry.
You can, however, change the appearance of your website by changing its theme. Each industry-specific template includes a set of styles from which you can choose to help you achieve the look you want for your site. Importantly, you can experiment with different styles until you find one you like without losing any of your content.
If you need some inspiration, check out some other GoDaddy websites in our GoDaddy Website Examples article.
Changing a GoDaddy Style
The GoDaddy website builder offers more than 20 styles for each industry-specific template. Different styles will alter the overall look and feel of your website, including the location of your business logo and the navigation bar.
To change a GoDaddy style:
- Starting on the main dashboard, click on the “Style” tab.
![How to use the GoDaddy website builder.]()
- Click on the “Try a new look” button.
![How to use the GoDaddy website builder.]()
- The available styles will then appear, featuring your content. Scroll through them and click on the style you want to try. Your new style will then appear with your website information.


Changing a Style’s Accent Color
At the style level, you can change the accent color for your website. The accent color appears in headings, buttons, backgrounds and other website elements. The GoDaddy website builder allows you to use one accent color along with black and white.
- From the “Style” tab, click on the “Color” drop-down arrow to open this submenu.
![How to use the GoDaddy website builder.]()
- You’ll then have three options for picking your accent color:
- Select a color that matches your logo from the options provided.
- Enter your preferred color’s six-digit hex code.
- Use the slider to pick a custom color.
- Use the “Paint Your Site” slider to change how the GoDaddy website builder applies color to your site. You can choose from “Light,” “Colorful,” and “Dark” with some in-between options.
- After you select your accent color, click on the “Color” drop-down arrow again to close the submenu.

Changing Fonts in GoDaddy
GoDaddy simplifies the font selection process by providing recommended font pairings from which you can choose. You can, of course, pick your own font pair if you prefer. Either way, your website can only use two different fonts.
- From the “Style” tab, click on the “Fonts” drop-down arrow to open this submenu.
![How to use the GoDaddy website builder.]()
- Scroll through the suggested font pairings and choose the one you like.
- Pick a “Primary” font (used for headings) and a “Secondary” font (used for body text).
- Click on the “Fonts” drop-down arrow again to close the submenu.

Changing Buttons in GoDaddy
The GoDaddy website builder uses two types of buttons: “Primary” for the main calls-to-action and “Secondary” for supporting actions like “Learn More.” However, not all styles feature both button types.
- From the “Style” tab, click on the “Buttons” drop-down arrow to open this submenu.
![How to use the GoDaddy website builder.]()
- Click on the button type you want to change — either “Primary” for the main buttons or “Secondary” for the supporting buttons.
- Unselect the “Use theme color” toggle if you want to use black or white for your button color instead of this default option.
- Under the “Choose a button style” section, select your preferred button shape and color.
- Click on the “Done” button when you’re finished.
- Click on the “Buttons” drop-down arrow again to close the submenu.

Customizing the Header in GoDaddy
Your chosen theme will determine the look and feel of your site’s homepage header area. However, you can customize the background to better suit your business and help achieve your website’s objective.
Most themes enable you to use images, videos, or slideshows in the background of your homepage header. You also can usually adjust the text placement and the appearance of the navigation menu.
To change header image:
- Ensure the header image already appears in your preferred location. If not, follow the instructions in the “Changing the GoDaddy Style” section above to select the style with your desired image position.
![How to use the GoDaddy website builder.]()
- Next, click on the “Update” button in the lower-right corner of the image to open the “Cover Media” options menu.
- Click “Change Image” to upload an image of your own or choose from one of GoDaddy’s stock photos.
- Click “Edit” to edit your image’s settings.
![How to use the GoDaddy website builder.]()
- Use the right-side menu to do things like add a filter and edit contrast, brightness, opacity and more
- Use the left-side menu to add text or a graphic on top of your image.
- Click on the “Continue” button when you’ve finished.


Adding a Video to GoDaddy Header
Using a video in your homepage header can help your site quickly grab a visitor's attention. It’s important to note that videos used in headers shouldn’t have sound.
To add a video to the header:
- From the “Cover Media” menu, select the “Video” tab at the top of the menu.
![How to use the GoDaddy website builder.]()
- To upload your own video or select a stock video, click on the “Upload, select or create a video” button and then on the “Change video” link.
- Upload your own video or select a stock video, and then click on the “Insert” button.
- In the “Describe this video” section, enter a brief description of the video that screen readers will read to low-vision visitors.
- Leave the “Play video on mobile devices” toggle unselected so a still image will appear instead of your video on smartphones. This best practice will help your site load faster.
- You may also upload a video from a URL by selecting “Import from URL” and entering the URL of your choosing.
- Click on the “Done” button to proceed.

Setting Up Pages and Site Navigation in GoDaddy
Because your website most likely will have multiple pages, its navigation menu allows visitors to easily find and move between those pages. Try to limit your main, top-level navigation menu to just five or six items.
The first task in setting up your website’s navigation involves ensuring you have all the pages you want displayed in your menu. If your chosen template didn’t come with all the pages you want, you’ll need to add pages to your website.
Your main navigation menu also can include drop-down menus for subpages or links to external websites.
Adding a Page to Your GoDaddy Website
When you add a standard page to your GoDaddy website, you must decide if you want it to appear in the navigation menu. If not, you could instead list it in the footer or allow visitors to access it from links or buttons on other pages.
- From the “Website” tab, click on the plus (“+”) symbol to the right of “Site Navigation.”
- Click “New Page” and then choose a blank page or choose from a list of premade layouts sorted by categories like “About,” “Contact” and more.
- Once you have made your selection, your new page’s menu will appear.
![How to use the GoDaddy website builder.]()
- Enter the title of your new page in the “Page Title” field.
- If you don’t want the page to appear in the navigation menu, deselect “Show in Navigation.”
- If you want the page to appear in the footer, select “Show in Footer.”
- If you want this to be a private page accessible only to members or people you designate, select “Private Page.”
- Click on the “Create Page” button. The GoDaddy website builder will then create your page and list it under the “Site Navigation” section if you chose this option.

Reordering the Navigation Menu
On the “Website” tab under the “Site Navigation” section, you’ll find a list of your site’s pages in the order they appear in the navigation menu. When you add a page, it automatically shows up at the bottom of the list. If you want to move that page within the navigation menu, simply drag it to your preferred location.
- From the “Website” tab, click on the icon to the right of “Site Navigation” that looks like an equal (“=”) sign with arrows above and below. This will open the “Reorder Pages” options.
![How to use the GoDaddy website builder.]()
- While the homepage must remain in the top position, you can reorder the rest of the pages by clicking on a page and dragging it to the desired location. This changes the page order in the navigation menu.
- When you have your pages in the correct order, click on the “Done” button.

Create a Drop-down Menu in GoDaddy Navigation
To keep the number of menu items in your site’s top-level navigation at no more than five or six, you may need to create drop-down menus with subpages. To do this, first create the pages using the instructions above. You can then add a drop-down menu and select which pages it’ll include.
- From the “Website” tab, click on the plus (“+”) symbol to the right of “Site Navigation.” The “Add Page” menu will then appear.
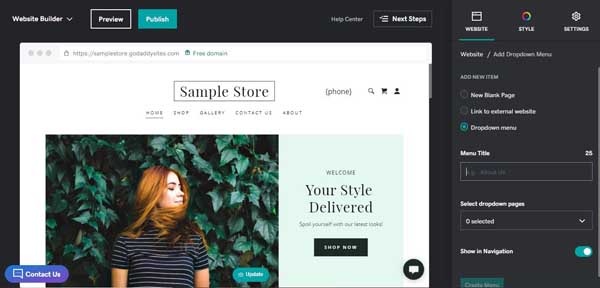
- Click on the “New dropdown menu” button to open the drop-down menu options.
![How to use the GoDaddy website builder.]()
- In the “Menu Title” field, type the words you want to appear in the menu.
- Click on “Select dropdown pages” and check the boxes next to the pages you want to appear under your new drop-down menu.
- Click on the “Create Menu” button. Your new drop-down menu will then appear within your website’s main navigation menu.
Deleting Pages
You can hide a page from your main navigation menu or you can delete it completely from your website.
- From the “Website” tab, hover over the page you want to delete and then click on the gear icon that appears on the far right.
![How to use the GoDaddy website builder.]()
- To completely delete a page, click on the “Delete Page” option and confirm you want to delete the page.

Working With GoDaddy Sections
When you add a blank page to your GoDaddy website, it won’t come with any content. To add content to those pages, you must add sections. GoDaddy offers multiple options for sections that vary based on the industry template you chose when you started to build your website.
Adding a Section
The GoDaddy website builder offers a staggering number of sections. It also recommends sections to you based on your specific industry. Each section contains prefilled content you can customize to suit your business.
- There are two ways to add a section, depending on if you’re starting from a blank page or one that already has content:
- From a blank page, click on the “Add Section” button.
- From a page with existing content, hover over the plus (“+”) symbol above or below an existing section and click on the “Add Section” button that will then appear:
![How to use the GoDaddy website builder.]()
- You’ll then see a long list of available sections with multiple options for each type.
![How to use the GoDaddy website builder.]()
- Scroll through the available sections and click the “Add” button when you find one you like.


Using the “Sections” Menu
You can move, duplicate, or delete sections with the “Sections” menu. It enables you to move a section up or down on the current page using tools that appear at the top of that section or move whole sections to a new page.
To move, duplicate, or delete a section:
- Hover over the top area of the section you want to move. A toolbar will then appear. Click on the ellipsis (“…”) to open the “Sections” menu.
![How to use the GoDaddy website builder.]()
- You can take three actions from this menu:
- Click “Duplicate Section” to make a copy of the section.
- Click “Move Section” to move the section to a new page.
- Click “Delete Section” to permanently delete the section.

Make your selection, and then provide any additional details requested by the GoDaddy website builder.
To move a section on the current page:
- Hover over the top area of the section you want to move. A toolbar will then appear. Click on the “up” or “down” arrows to move that section to a new location on the page.
Changing a GoDaddy Section Background Color or Image
Some sections have solid backgrounds while others can use images in their backgrounds. Varying the backgrounds of different sections on a page can not only create visual interest, but also indicate when the content switches to another topic.
- Click on the section you want to change. An options menu will then appear on the right.
![How to use the GoDaddy website builder.]()
- Click on the “Accent” color you want to use for the background. Review the “Changing Site Style” portion of this article if you want to change the accent color used on your website.
- Click on the “Done” button.

To change a section’s background image, follow the same steps included above for changing your website’s header image.
Customizing a Content Section in GoDaddy
You’ll create your website’s main content, including the main portions of text and images to illustrate that text, using content sections. Each section has different options, but, for most of them, you can change the layout, background color, alignment, text, and image as well as add action buttons.
You can find content sections in the following section categories:
- Content
- Introduction
- About
To choose a different layout:
- Click on the section you want to edit. The “Section” tab will then appear on the right.
- From the “Section” tab, click on the “Layout” option.
- Scroll through the available layouts, select the one you want, and then click on the “Done” button.
To change the background color and alignment:
- From the “Section” tab:
- Click on one of the three “Accent” colors to change the background color.
- Click on one of the three “Alignment” options to change the text alignment.
- Click on the “Done” button to save your changes.
To edit the content:
- From the “Section” tab, edit the “Title,” “Headline,” and “Description” fields as desired.
- If you don’t want a piece of existing text, delete the text in that field.
- Click on the “Done” button.
To edit or remove an action button:
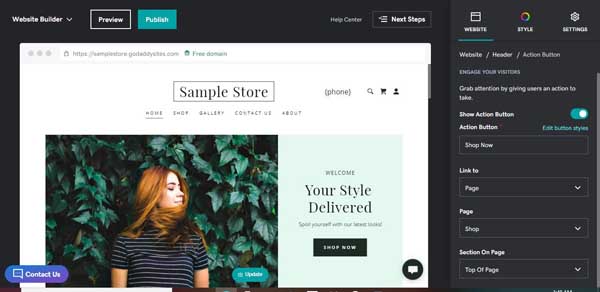
- From the “Section” tab, scroll down and click on “Action Button.”
- If the section doesn’t already have an action button, you can not add one. However, action buttons can be removed by toggling the “Show Action Button” switch to “off.”
![How to use the GoDaddy website builder.]()
- In the button’s label field, enter the text you want the button to display.
- Click “Edit button styles” to choose from a variety of shapes for your button.
- Under the “Link to” section, select the type of action that should happen when someone clicks the button (e.g., connecting to a “Page” or “Website URL,” calling a “Phone” number, or sending an “Email”).
- Depending on the action you chose in the previous step, select the appropriate page or enter the website URL, phone number, or email address.
- Click on the “Done” button.

Managing Section Groups
Many content sections have section groups that combine batches of content. Here’s one example:
The GoDaddy website builder doesn’t let you use more than two or three columns on a page, depending on the section layout. To change from two to three columns (or vice versa), just add or delete a section group. Most layouts let you have up to 12 section groups.
When a section includes section groups, you’ll edit each group individually. It’s a similar process to how you edit other content, as outlined above.
To add a section group:
- Click on one of the section groups. The “Section Groups” panel will then appear in the menu on the right.
- Click on the “Add” link to the right of the “Section Groups” subhead.
![How to use the GoDaddy website builder.]()
- Edit the content as described in the “Customizing a Content Section” instructions above, and then click on the “Done” button.

To delete a section group:
- Click on the section group you want to delete. A small toolbar will then appear at the top of that section group.
![How to use the GoDaddy website builder.]()
- Click on the trash can icon.
- Confirm you want to delete the section group by clicking on the “Delete” button. The GoDaddy website builder will then delete that group.

Working With Images and Other Media in GoDaddy
The GoDaddy website builder allows you to add a variety of media to your website, including:
- Images (e.g., .jpg, .jpeg, and .png files up to 30 megabytes, but not .gif files or animated images)
- Video (e.g., .mp4 files or embedded videos from Vimeo and YouTube)
- Audio (e.g., embedded tracks or playlists from SoundCloud)
Adjusting Images
You can change, add, or delete images using the GoDaddy website builder. It has a huge collection of royalty-free, stock images you can use for free on your website.
You can work with images in multiple ways, depending on the section and layout you use. This guide covers the basics, but you can always contact GoDaddy’s customer service team if you need additional help.
Here’s where you’ll find images when creating your GoDaddy website:
- As “Cover Media” in headers
- As a “Background Image” in various sections
- As individual images in “Content” sections
- In “Section Groups”
- In “Photo Galleries”
- In “Logos and Badges”
The process for adding and editing images in all of these locations follows the same process as the one we lined out in the “Edit Header Image” section of this article. Simply click on the image you would like to modify or the section where you would like to add an image, select an image to upload and click “Edit” to modify the image’s color, contrast and more.
The best way to add an image is by adding a section and layout with a placeholder where you want an image to appear. Then, follow the directions on how to change an image to replace the default image with the image of your choice.
To delete an image:
- For most sections and section groups, click on the image you want to delete. An options menu will then appear on the right.
![How to use the GoDaddy website builder.]()
- Click on the trash can icon that appears to the right of the “Current Image” subhead. Confirm your selection.
- The GoDaddy website builder will then remove the image from your website. There’s no “undo” option, so delete carefully.

Adding a Photo Gallery
A photo gallery features a collection of images. Artists, photographers, and graphic designers often use photo galleries to show off their portfolio of work. Other businesses use photo galleries to highlight different products or aspects of their business.
- Click on the plus (“+”) symbol between two sections then click on the “Add Section” button, and, finally, select “Image Gallery” and then “Photo Gallery” from the list of options.
![How to use the GoDaddy website builder.]()
- Review the various layouts and click on the “Add” button below the one you want to use.
![How to use the GoDaddy website builder.]()
- Within the menu on the right side of your screen, scroll down until you see the “Gallery Images” section.
- Because you probably don’t want to use the images GoDaddy automatically inserts, click on every image, then click the red “Remove from Gallery” option and confirm your choice.
- To add images, click on the plus (“+”) symbol under “Gallery Images.”
- To add your own images, click on the “Add images” button and select the images you want to upload.
- To add stock photos, scroll down to view the available stock images.
- Select the images you want in your gallery, and then click the “Add to Gallery” button.


Uploading Videos
The GoDaddy website builder allows you to upload your own videos or link to existing videos in Vimeo or YouTube.
- Click on the plus (“+”) symbol between two sections then click on the “Add Section” button, followed by “Audio and Video” and select “Video” from the list of options.
- Review the different section layouts and click the “Add” button below the section you want to use.
![How to use the GoDaddy website builder.]()

To upload a video or use a royalty-free, stock video:
- Click on the “Upload, select or create a video” radio button.
![How to use the GoDaddy website builder.]()
- Click on the “Change video” link.
- Click on the “Add videos” button to upload your own video or choose a video from the “Stock Videos” section, and then click on the “Insert” button.
- In the “Describe this video” section, enter a brief description of the video that screen readers will read to low-vision visitors.
- Click on the “Done” button.

To use a video from YouTube or Vimeo:
- Click on the “Import from URL” button.
- Highlight the existing URL in the “Video URL” field, delete it, and then paste in the URL for the YouTube or Vimeo video you want to use.
- Scroll down to enter the video’s “Title” and a “Video Description.” The video description in this example is the text that’ll appear to the right of the video.
- Click on the “Done” button.
Connecting With Customers Using GoDaddy
The GoDaddy website builder provides multiple ways for you to connect with your website visitors. Specifically, you can:
- Add social media icons that direct people to your business’s social media channels
- Embed a social media feed from Instagram
- Add an email subscription form
- Add a contact form
Want to learn more about what GoDaddy has to offer for social media tools? Check out our GoDaddy Social review.
Adding Social Media Icons to GoDaddy
GoDaddy provides premade icons for the following social media platforms:
- YouTube
- Yelp
- Houzz
These icons enable you to link your website to your business’s social media pages. For Facebook, Twitter, Instagram, and Yelp, you can connect your social media account directly to your GoDaddy account. This connection supports integration of various features, such as automatically updating your business address, hours, or reviews.
To add social media icons:
- Click on the plus (“+”) symbol between two sections then click on the “Add Section” button and select “Social” from the list of options.
![How to use the GoDaddy website builder.]()
- Click on the “Add” button to add the social media section.
- Paste the link to your business’s social media account in the field below the corresponding platform name.
- To connect your Facebook, Twitter, Instagram, or Yelp accounts to your GoDaddy account, click on the “Connect...” link and follow the prompts.
- Connecting to Instagram will allow you to embed an Instagram feed directly onto your website.
![How to use the GoDaddy website builder.]()
- Click on the “Done” button.


Adding an Email Subscription Form
Many businesses collect email addresses from their website visitors so they can send them news and updates in the future. Most GoDaddy templates already include a subscription section, but here are directions for how to set it up as well as how to add a subscription section if your chosen template doesn’t have one already.
To add a “Subscribe” section:
- Click on the plus (“+”) symbol between two sections then click on the “Add Section” button. Next, select “Subscribe” from under the “Blog & Newsletter” tab. Choose the layout you want to use, and then click on the “Add” button.
![How to use the GoDaddy website builder.]()
- The “Subscribe” section will then appear alongside an options menu on the right.
![How to use the GoDaddy website builder.]()
- The “Subscribe” menu includes the following options:
- Layout: Use this to change the overall layout of this section.
- Accent: This allows you to adjust the background color.
- Manage All Subscribers: You can access and manage your subscribers through this link once you have some.
- Headline: Use this field to adjust the large text that appears at the top of the form.
- Description: Enter text here about why visitors may want to subscribe and what that subscription will provide.
- Thank You Message: This is where you can edit the text that appears after someone subscribes.
- Email: This is the text that appears in the email field so people know what to enter (it’s best to keep it as “Email”).
- Button Label: Use this to edit the text that appears on the button a visitor must click to subscribe. Make sure the text clearly communicates that this action will sign them up for something.


Adding a Contact Form
Contact forms provide yet another great way to connect with your website visitors. Usually found on a website’s “Contact” page, these forms can appear on any page.
- Click on the plus (“+”) symbol between two sections then click on the “Add Section” button. Next, select “Contact Us” from the list of options, choose the layout you want to use, and then click on the “Add” button.
![How to use the GoDaddy website builder.]()
- The “Contact Us” menu will then appear on the right with a range of potential fields. Complete the fields you want to include on your contact form and delete any information from those you want to exclude.
- Click the on the “Done” button.

Adding Reviews in GoDaddy
One of the GoDaddy website builder’s best features is how it pulls in business reviews from Facebook, Google Business Profile, and Yelp when you connect these accounts to your GoDaddy account.
You also can add reviews and testimonials manually to ensure only positive reviews are displayed. We’ll show you how to do this both ways.
Connecting to External Reviews
By connecting your GoDaddy website to your Facebook, Google Business Profile, and Yelp accounts, the reviews people leave on those external platforms will then automatically appear on your GoDaddy website.
- If your website’s template doesn’t already include a “Reviews” section, click on the plus (“+”) symbol between two sections then click on the “Add Section” button. Next, select “Reviews” from the list of options, choose the layout you want to use, and then click on the “Add” button.
- Click in the “Reviews” section to open the options menu on the right side of your screen.
![How to use the GoDaddy website builder.]()
- Click on “Background Image” to change the image that appears behind the reviews.
- Make sure to select the “Connect to external source” button, and then use the drop-down submenu below that to select Facebook, Google Business Profile, Yelp or Yotpo.
- Click on the “Connect to [desired platform]” button that appears on the website preview on the left side of the screen, and then follow the prompts to connect your account.

Adding Reviews Manually
If customers send reviews directly to you or you receive them on another platform, you can manually add them to your website.
- If your website’s template doesn’t already include a “Reviews” section, click on the plus (“+”) symbol between two sections then click on the “Add Section” button. Next, select “Reviews” from the list of options, choose the layout you want to use, and then click on the “Add” button.
- Click in the “Reviews” section to open the options menu on the right side of your screen.
- Click on “Background Image” to change the image that appears behind the reviews.
- Select the “Add reviews manually” button.
![How to use the GoDaddy website builder.]()
- Reviews work like section groups. Click on each review, edit the fields to match your review, and then click on the “Done” button.

Adding a Favicon to a GoDaddy Website
Have you noticed the little picture that appears on the left side of a browser tab? Called favicons, these tiny images help internet users quickly identify the website they’re on.
Most favicons appear as a miniature version of a company’s logo or other graphic that aligns with its branding. Small and square, favicons typically measure about 16 by 16 pixels.
If you don’t yet have a favicon, you can create one with a tool like Favicon.io. This tool gives you a zip file to download. From that file, use the favicon.ico file as your favicon.
It’s easy to add a favicon to a GoDaddy website.
To add a favicon:
- Click on the “Settings” tab.
- Click on “Favicon.”
- Click on the “Upload” button and then upload your favicon file.
- Click on the “Done” button. Your favicon will then appear after you publish your website.
Editing the Footer in GoDaddy
One drawback of using the GoDaddy website builder is that it doesn’t allow you to fully customize your footer. It does, however, allow you to:
- Choose a background color
- Include a copyright notice, if desired
- Adjust the footer note from the default, which appears as “Powered by GoDaddy”
- Display your business’s address and phone number (available on one layout)
- Add icons linked to your social media accounts
- Include site navigation links to other pages on your website
To edit the footer:
- Scroll down to the bottom of your website, and then click in the footer area to open the footer options menu on the right.
![How to use the GoDaddy website builder.]()
- To change the layout, click on “Layout,” select your preferred layout option, and then click on the “Done” button.
- To change the background color, select another color in the “Accent” section, and then click on the “Done” button.
- Enter your business’s information in the available fields, if desired.
- Click on “Social Accounts,” enter the URL for each of your business’s social media accounts for which you want to display an icon, and then click on the “Done” button.
- To add page links in the footer, click on “Site Navigation” to open the “Site Navigation” menu.
- For each page you want to appear in the footer, click on the gear icon to the right of the page name. Next, select “Page Settings” then “Show in Footer,” and then click on the “Done” button. Repeat for each page you want to appear in your footer.

Previewing and Publishing Your GoDaddy Website
Once you finish building and customizing your GoDaddy website, it’s time to go live on the internet. To preview your website, click on the “Preview” button at the top of your page. This is your chance to make sure everything looks the way it should and make any necessary changes before going live.
To publish your GoDaddy website, click on the blue “Publish” button at the top of the screen. Though it’s possible to publish your website with GoDaddy using a free subdomain, ideally, you will upgrade to a premium plan to enjoy all of the platform’s offerings. This way you can connect your own domain or a domain purchased through GoDaddy.
Next Steps
Hopefully, this guide proved helpful as you built your GoDaddy website. For additional support, visit GoDaddy’s Customer Support page, or get started building your website for free immediately by visiting GoDaddy.