How To Make a Webnode Website: A Beginner’s Guide To Webnode
Last Updated: By TRUiC Team
This step-by-step guide will walk you through the process of creating a website with Webnode so you can get your business’s online presence up and running within minutes. By the end, you’ll have a simple website that suits your business and looks great on mobile devices.
Ready To Get Started?
Curious to see what the Webnode website builder has to offer? Learn more by visiting Webnode.
Step 1: Sign Up for Webnode
The first step in building a Webnode website for your small business involves creating an account. You can always sign up for a free Webnode account, but we recommend purchasing one of the company’s premium (paid) plans. That way, you’ll have immediate access to all the features your business needs.

Go to Webnode.com and click on the “Get started for free” or “Create a Website” button to sign up. Next, enter your website’s name, your email address, and a password. Then, click on the “Register & Create” button.
Once you click on the “Register & Create” button, Webnode’s registration wizard will walk you through the rest of the steps needed to create your website. You’ll first need to choose the type of site you need (i.e., either a “Website” or an “Online Store”). Because we plan to create a service-based business website for this tutorial, we’ll click on the “Website” button.
You’ll then need to choose a Webnode template that most closely matches the type of website you want to create. You can narrow down the options by selecting one of the popular categories listed at the top.
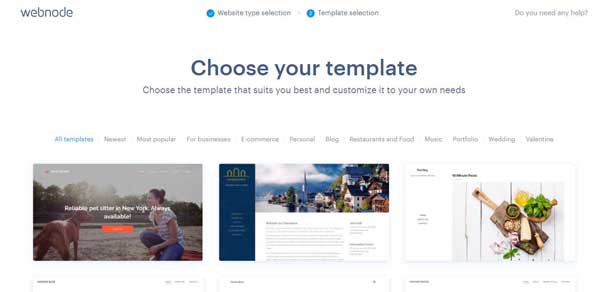
Once you decide on a template, click on the “Choose” button. The Webnode website builder will then create your website and prompt you to begin editing its content and design elements. Click on the “Edit my site” button to get started.
Upgrade Your Webnode Website
If you didn’t do so during the sign-up process, this is a great time to upgrade to a premium plan as well as purchase your domain. Why? Doing so will give you immediate access to the premium features you’ll need to successfully build your website.
For most small businesses, we recommend the Webnode Standard plan. It not only provides everything most small businesses will need, but also includes an ad-free experience, multiple languages, Google Analytics, and more. From the “My Projects” area of the Webnode dashboard, click on the “Upgrade to Premium” link, select your plan, and then complete your purchase.
When you’re ready to finish building your Webnode website, click on the “Start to edit” button from the “My Projects” area of the Webnode dashboard.
Step 2: Set Up the Page Structure
In the Webnode website builder, each template will automatically include a set number of pages. The next thing you must do is ensure you have all the pages you need for your website — and confirm they’re set up in a logical structure. Most small business websites will need the following four pages:
- Homepage: This is the first page most visitors will see. It should include an overview of your business and clear calls to action (CTAs) to motivate them to contact you, make a purchase, or take another action.
- “About” Page: This page provides visitors with more detailed information about you and your business.
- “Services” Page: This page should provide more information about the services your business offers.
- “Contact” Page: This page gives visitors the information they need to contact your business and access your services. Typically, it should include a business phone number, street address, email address, contact form, and your business’s hours of operation.
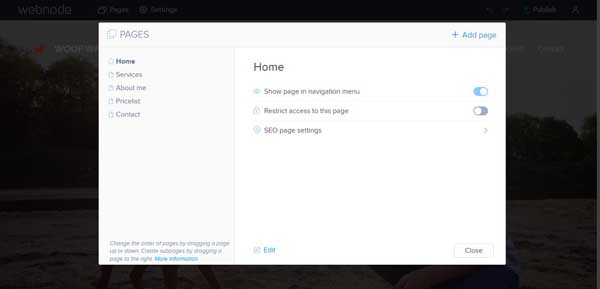
Click on the “Pages” icon at the top of the Webnode dashboard to open the “Pages” menu. This menu includes a list of your template’s premade pages and provides access to your website’s page structure.
For the purposes of this tutorial, we want our Webnode website to include the following standard pages: “Home,” “About,” “Services,” and “Contact” — in that order. Our chosen template automatically includes these four pages, but also includes a “Pricelist” page we don’t need so want to delete. If the template you choose doesn’t have the exact pages you need, you can simply add or delete pages from the “Pages” menu.
To delete a page:
- On the left side of the “Pages” menu, click on the page you want to delete.
- Click on the “Delete Page” option from the drop-down menu that then appears.
- Click on the “Delete” link to confirm you really want to delete this page.
To add a page:
- Click on the “+ Add page” link in the upper-right corner of the “Pages” menu.
- Select a page template from the available options, and then click on the “Choose” button.
- Enter a page name and click on the “Create” button.
To reorder the pages:
- On the left side of the “Pages” menu, drag and drop page titles until they appear in your desired order.
- Click on the “Close” button when you’re finished.
Step 3: Upload Your Logo
After you create your Webnode account, select your template, and edit your page structure, it’s time to customize your website so it aligns with your business’s needs and branding. Let’s start by adding your business logo.
Your website’s navigation bar can contain a logo, title text, or both. In addition, you can edit your website’s logo from any page.
To change the logo:
- Click on the placeholder logo in the upper-left corner of your website. A pop-up window will then appear with two options: “Logo” and “Format.”
- Click on the “Logo” option.
- The pop-up window will then change to show two additional options: “Change logo” and “Remove logo.”
- Click on the “Change logo” option to open the “Choose Image” screen.
- Click on the “+ Upload image” link in the upper-right corner of the “Choose Image” screen.

- Select your business logo from wherever you saved it on your computer.
- Click on the “Open” button.
- Click on the “Close” button once your logo finishes uploading.
To change the title text:
- Click on your business logo in the upper-left corner of your website.
- Highlight the text you wish to change and start typing.
- A pop-up window also will appear with two options: “Logo” and “Format.”
- Click on the “Format” option.
- An editing toolbar will then appear to give you a variety of options to format the text.

Step 4: Update the Homepage Header Area
The homepage header area of your website is essential to a visitor’s experience, and this section will help visitors determine if they want to remain on your site or look for another site to meet their needs.
The main elements of a Webnode homepage header area include:
- The “Navline”: This includes your navigation menu, logo, and website title.
- The “Claims” or “Content” Sections: This information appears directly underneath the “Navline” and can include a full-width image, header and subhead text, a CTA, and more.
Keep reading to learn how to customize your website’s homepage header elements.
Change the Header Type
Webnode gives users three options for their homepage header: “Navline Only,” “Navline & Claims,” or “Navline & Content.” We recommend you click through each type before selecting one to determine which header type will work best for your business.
To change your header type:
- Hover over your navigation menu bar until the “Settings” icon appears.
![How to make a Webnode website.]()
- Click on the “Settings” icon.
- Click on the “Header Type” option in the menu that’ll then appear on the right side of your screen.
- Choose your preferred header type from the three available options.

Change the Header Image or Color
Webnode users also can control the color or image that displays behind their “Navline” and “Claims” or “Content” sections. If you choose to use an image, keep in mind that it should tell users something about your business and its offerings.
Consider using a header image that meets one of the following criteria:
- It highlights the products or services you offer.
- It shows your business in action.
- It provides an outside view of your business.
- It shows happy customers using your products or services.
To change the image or color in the “Navline” and “Claims” or “Content” sections:
- Hover over your navigation menu bar until the “Settings” icon appears.
- Click on the “Settings” icon.
- Click on the “Navline background” option in the menu that’ll then appear on the right side of your screen to change your “Navline” color or image.
- Click on the “Section background” option in the menu that’ll then appear on the right side of your screen to change your “Claims” or “Content” section’s color or image.

Change the Menu Type
If you want to customize the look and feel of your “Navline” and navigation menu further, the Webnode website builder makes it easy to do so.
To change your menu type:
- Hover over your navigation menu bar until the “Settings” icon appears.
- Click on the “Settings” icon.
- Click on the “Advanced settings” link in the menu that’ll then appear.
- Click on the “Navline settings” link.
- Click on the “Menu type” link.
- Choose from the available menu types: “Classic,” “Centered,” “Bottom,” “Boxed Hamburger,” and “Hamburger.”
Edit Text Within the “Claims” or “Content” Sections
You want your Webnode website’s homepage header headline, subhead, and CTA to clearly communicate what your business offers. Be descriptive, but avoid using a cliché as well as overused or otherwise unprofessional words and phrases. For your CTA button or link, commonly used phrases like “Call ###-###-####,” “Book Now,” “Buy Now,” and “Contact Us” can prove highly effective.
To edit “Claims” or “Content” text:
- Click on the text box within your “Claims” or “Content” section.
- Enter your preferred text.
- Use the pop-up editing toolbar to add links, edit fonts, add lists, etc.
Replace the Goods/Services Images
The template we choose for our sample service-based business website automatically includes a grid that highlights the primary services offered by this type of business. You may want to change the images or icons that appear within this section.
Note: Ensure you own the copyright for any image or icon you use on your website or choose royalty-free options. If you need to source royalty-free images, check out Pexels.com, Unsplash.com, or Pixabay.com.
To replace a goods or services image:
- Click on the grid element header that contains the image you want to replace. An editing toolbar will then appear above that grid element.
![How to make a Webnode website.]()
- Click on the “Change image” link in that editing toolbar.
- Select an image from the list of provided options and icons or click on the “Upload image” button to upload an image from your computer.

Update the CTA Buttons
CTA buttons are one of the most important elements of your website. They should be attractive and stand out without looking over the top or distracting. In the Webnode website builder, your chosen template will determine your site’s CTA button placement. But, you can make a few changes to existing CTA buttons.
To update a CTA button:
- Click on the CTA button you wish to edit. An editing toolbar will then appear above that button.
- Enter new text, as needed.
- Click on the “Edit link” option in the editing toolbar to change the linked destination of your CTA button (e.g., another page on your website or an external site).
- Click on the “Style” option in the toolbar to choose from five premade button styles.
- Click on the “Align” option in the toolbar to choose if the button will appear in the center, left, or right part of the page.
![How to make a Webnode website.]()

Update the Footer
The footer is another crucial element of every website. Visitors expect a website’s footer to contain specific information, including a current copyright date, links to the business’s “Terms of Service” and “Privacy Policy” pages, contact information, and hours of operation (if applicable). To update the footer, simply click on a text block within it and edit the existing text.

Step 5: Publish Your Webnode Website
Once you make all the necessary edits to your website, it’s time to publish it online. Simply click on the “Publish” link in the upper-right corner of the Webnode dashboard and Webnode will publish your website to the domain you purchased from the platform.
Note: If you purchased your domain name from another domain registrar, you’ll need to transfer it to Webnode before publishing your website. Check out our How To Use Webnode tutorial for more details on this process.
Once your website is active, review every page and test all of the links to ensure everything looks and functions as expected. If anything doesn’t look right, return to the Webnode dashboard to make additional edits before you republish your website.
Congratulations! You successfully built a website for your business using the Webnode website builder.
Final Thoughts
Now that you've launched your Webnode website, you can focus on growing your small business and making the most of your online presence. For a more in-depth look at some of the Webnode website builder’s features, check out our How To Use Webnode tutorial. To help you determine if Webnode is the right platform for your small business, read our Webnode Website Builder Review.